Table of Contents
Introduction :: Overview :: Material Templates :: Asset Manager
Techset :: Technique :: Vertex Shader :: Pixel Shader :: Compiling Shaders / Download :: Linking Shaders
If you have no idea what shaders can be used for, click one of the images below and see for yourself.
I have a whole lot of other videos featuring hlsl shaders so go check them out if you are interested.


Introduction
Back in 2015, a guy called Bear released his shader-linker that made it possible to add new hashed shader names to a shader-names-table the game uses to lookup shaders when linking fastfiles. The problem was that he did not specify how to setup the material so that the game could use these new shaders and with that, no one used it as no one knew how to use it.
Link to the original post: https://archive.raid-gaming.net/topic/1679-adding-new-sm3-hlsl-shaders-to-cod4/
The full source-code he posted: https://pastebin.com/4be66PEU
You need to know the .hlsl syntax and some basic understanding of how the DirectX 9 rendering-pipeline works.
If you need a quick overview, feel free to look around the following sites:
- General:
- Vertex Shader / Transformations / Matrix / Spaces:
- Pixel Shader / Texcoords ( UV’s ):
Creating materials that use custom shaders
Material setup depends heavily on your shader use-case and can become quite tricky and messy. The whole material chain depends on things like:
- Do you want to use/sample textures within your shader?
- Material use-case eg. hud elements, xmodels, skies or brushes?
- Multiple shaders required for different lighting states?
- Which shader-inputs do you need for your use-case?
- The list goes on and on …
A quick overview of whats needed for any material in CoD4 to work.
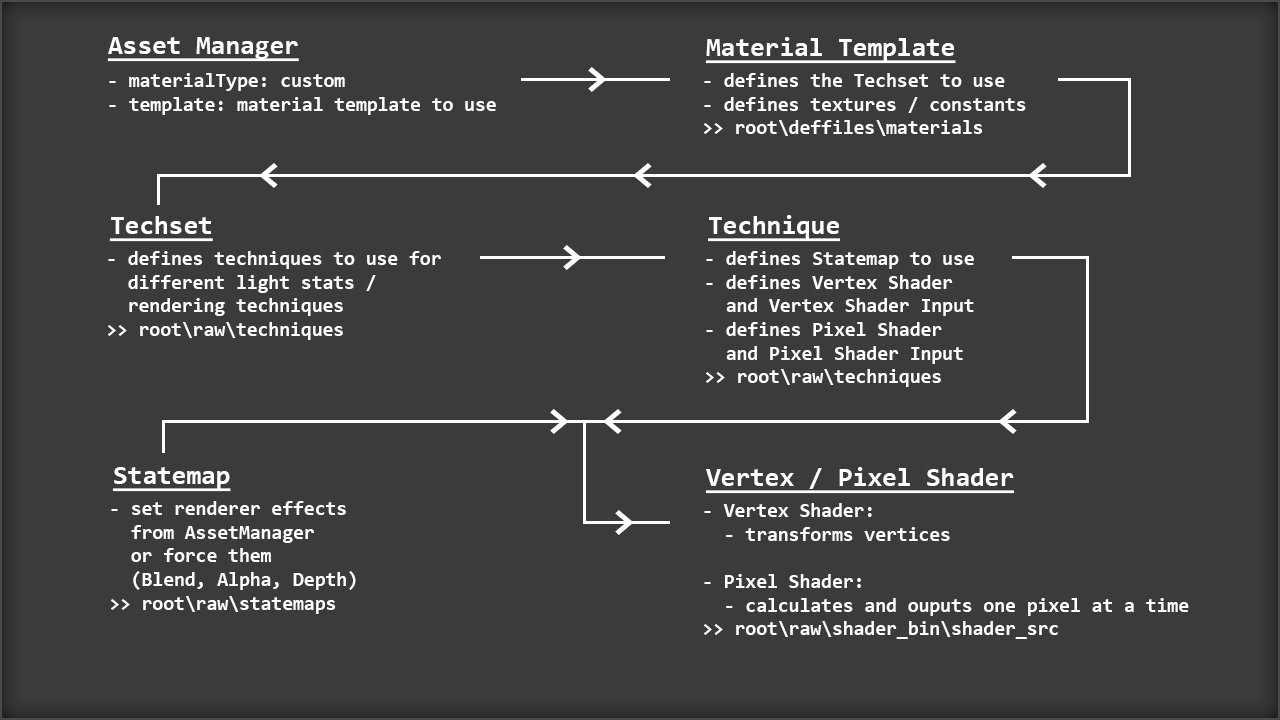
Quick links for the individual files within the material chain with more in-depth information
MaterialTemplates :: Techsets :: Techniques :: Statemaps :: PixelShader :: VertexShader
We are going to create a scrolling 2D material, that can be used for eg. HUD-Elements, to be able to somewhat explain the setup thats needed.
This is obv. very basic but starting with something different would be way to much for this scope.
1. Material Template > root\deffiles\materials
- Create a copy of the closest template related to our use-case. Would be mtl_2d.template in our case.
- Name it z_scrolling_hud.template
mtl_2d.template
#include "commonsetup.template"
techniqueSet( "2d" ); // set the techset to use >> root\raw\techsets

textureTable
{
    #if "$colorMap$" == ""
        #error "colorMap may not be blank in 2d materials"
    #endif
    // This references our image as "material.colorMap" in the technique we are going to create later on >> root\raw\techniques
    "colorMap" = map( "@tileColor@", "@filterColor@", "$colorMap$", @nopicmipColor@ ) "@formatColor@" : "2d";
}
refImage( "$colorMap$" );- This template fits perfectly, so all we need to change is the techset
- We are going to use this template only for this specific shader so we’ll give the techset the same name as our template
z_scrolling_hud.template
#include "commonsetup.template"
techniqueSet( "z_scrolling_hud" );
/* ... */
2. Asset Manager
- Create a new material with the following settings:
- Compile it
   + materialType : "custom"
   + blendFunc    : "Blend"
   + Template     : "z_scrolling_hud" ( the name of the template file we created in step 1 )
   + Color map    : "Input your Image" : "tile both*"
3. Techset > root\raw\techsets
- Search for 2d (the techset that was in the stock mtl_2d.template) and find 2d.techset
- Create a copy, name it z_scrolling_hud.techset and change it as follows:
2d.techset
"unlit":                // The lightstate / render technique ( 2d only uses unlit )
vertcol_simple2d; // This sets our technique >> root\raw\techniquesz_scrolling_hud.techset
"unlit":
   z_scrolling_hud;   // same name as the techset/material template (could be anything but we wont re-use any of the assets for other shaders)
Techsets in root\raw\techsets will be used by GPUs running ShaderModel 3, but CoD4 also supports ShaderModel 2 so we have to
create a copy of the new techset and place it in » root\raw\techsets\sm2 (a sm2 techset is needed or you’ll get errors on linking your fastfile)
4. Technique > root\raw\techniques
- Search for the technique vertcol_simple2d.tech ( the original 2d one from the techset we used in step 3 )
- Create a copy and name it z_scrolling_hud.tech
vertcol_simple2d.tech
{
   stateMap "default2d";                       // Defines the statemap to use >> root\raw\statemaps
   vertexShader 1.1 "vertcol_simple.hlsl"      // Defines our vertex shader   >> root\raw\shader_bin\shader_src
   {
   }

   pixelShader 2.0 "vertcol_simple.hlsl"       // Defines our pixel shader    >> root\raw\shader_bin\shader_src
   {
      colorMapSampler = material.colorMap;     // Defines the Texture from our Material Template   >> root\deffiles\materials
   }
   vertex.position = code.position;            // Vertex Shader Input: Vertex Positions in local-space/model-space
   vertex.color[0] = code.color;               // Vertex Shader Input: Vertex Colors
   vertex.texcoord[0] = code.texcoord[0];      // Vertex Shader Input: Texcoords ( UV's in range 0.0f - 1.0f )
}- Bear’s shader-linker only works with ShaderModel 3 shaders, so change the version to 3.0 (VertexShader and PixelShader)
- Rename both shaders to z_scrolling_hud and cut the .hlsl extension
- Comment out vertex.color[0] = code.color; because we are not going to use it in our shader (all defined inputs have to be used within the shader)
z_scrolling_hud.tech
{
   stateMap "default2d";
   vertexShader 3.0 "z_scrolling_hud"        // Defines our vertex shader   >> root\raw\shader_bin\shader_src
   {
   }

   pixelShader 3.0 "z_scrolling_hud"         // Defines our pixel shader    >> root\raw\shader_bin\shader_src
   {
      colorMapSampler = material.colorMap;
   }

   vertex.position = code.position;
   //vertex.color[0] = code.color;           // not needed
   vertex.texcoord[0] = code.texcoord[0];
}
5. VertexShader > root\raw\shader_bin\shader_src
- The VertexShader only needs to transform our vertices into worldViewProjectionSpace (cameraSpace)
- Create a new txt-file and call it: vs_3_0_z_scrolling_hud.hlsl (every custom VertexShader needs the “vs_3_0” suffix)
- Paste the following:
vs_3_0_z_scrolling_hud.hlsl
#define PC                       // Needed for linker
#define IS_VERTEX_SHADER 1       // Needed for the shader compiler
#define IS_PIXEL_SHADER 0        // Needed for the shader compiler
#include <shader_vars.h>         // includes our global constants needed in every shader ( included within the download below )

struct VertexShaderInput         // This struct contains our vertex data input defined in our technique >> root\raw\techniques
{                                // This uses something called SEMANTICS (like a pipeline into the shader)
                                 // >> https://docs.microsoft.com/en-us/windows/desktop/direct3dhlsl/dx-graphics-hlsl-semantics

   float4 position : POSITION;   // float4 defines the size, in this case x,y,z,w; we define the semanctic POSITION as position
   float2 texCoord : TEXCOORD0;  // float2 because we only need x y on a 2d element; this is our UV in range 0.0 - 1.0
};

struct PixelShaderInput          // This struct will contain the vertex shader's output that the pixel shader will be using
{
   float4 position : POSITION;
   float2 texCoord : TEXCOORD0;
};


PixelShaderInput vs_main(VertexShaderInput input)  // Writing into the struct PixelShaderInput, using struct VertexShaderInput as input
{                                                  // Note that the function has to be called "vs_main"
   PixelShaderInput output;

   output.position = mul(float4( input.position.xyz, 1.0f), worldViewProjectionMatrix);
   // - This transforms our vertex positions from local-space to projection-/camera-space by multipling our vertices with a transformation Matrix
   // - Because we defined position as a float4, we also have to return a float4
   // - The "w" component is more or less the depth (distance from the camera), we don't use that on a 2d element -> so we use a scale of 1.0f

   output.texCoord = input.texCoord;
   // - We don't need to transform our UV's, so output = input

   return output;
   // - Return the fully initialized PixelShaderInput struct ("output")
}
6. PixelShader > root\raw\shader_bin\shader_src
- The PixelShader will, as the name suggest, shade our pixels; 1 pixel at a time
- Create a new txt-file and call it: ps_3_0_z_scrolling_hud.hlsl (every custom PixelShader needs the “ps_3_0” suffix)
- Paste the following:
ps_3_0_z_scrolling_hud.hlsl
#define PC
#define IS_VERTEX_SHADER 0
#define IS_PIXEL_SHADER 1
#include <shader_vars.h>

struct PixelShaderInput             // This is the output struct from our vertex shader
{
   float4 position : POSITION;      // The SEMANTIC -> POSITION is not used within the pixel shader! But we still want to keep it here
   float2 texCoord : TEXCOORD0;
};

float4 ps_main(PixelShaderInput input) : COLOR     // As the pixelshader is only outputting a color, we link it to the SEMANTIC COLOR
{
   float4 output;                                  // Defining the variables we're going to be using
   float  newX;                                    // These can be defined within the code itself, I just like to define them at the top

   // horizontal scroll                      // Creating the scroll effect:
   newX = input.texCoord.x + gameTime.w;     // Add gameTime.w to our x-texcoord
                                             // gameTime.w increases linearly forever, and appears to be measured in seconds
                                             // ( now we get horizontal texcoords(x) above the 0-1 range                         )
                                             // ( if you would have set "tile both*" to "tile none" for your image in AssMan     )
                                             // ( the image would only draw as long as the texcoords are in range 0-1            )
                                             // ( anything above that would just be clipped of, thats how tiling textures work   )


   // tex2D() samples our texture with the given texture coordinates (UV's) and returns a colored pixel -> float4 color ( x,y,z,w or r,g,b,a )
   // function float4 tex2D() : tex2D(sampler, float2 texcoords)

   // Instead of input.texCoord (xy), we use our manipulated x-texcoord with the original y-texcoord:
   output = tex2D(colorMapSampler, float2(newX, input.texCoord.y));

   // If you want a fixed alpha channel (in-case your texture doesn't have one) with half the transparency we could do:
      // output = float4( tex2D(colorMapSampler, float2(newX , input.texCoord.y)).rgb, 0.5 );

   // We could also manipulate the alpha afterwards by doing:
      // output = tex2D(colorMapSampler, float2(newX , input.texCoord.y));
      // output.w = 0.5;

   // return float4 "output" As COLOR
   return output;
}
7. Compiling the shader so that cod-linker can access it
- Download the following package: v1.1_hlsl_xoxor4d.zip (includes all the files needed to compile your shaders)
- Copy the files within 2d_tutorial\additional_files into your cod4 root directory if you did all the above mentioned steps yourself
- Otherwise use the files within 2d_tutorial\whole_source (You still have to setup your material in Asset Manager as mentioned in Step 2)
- Go into root\raw\shader_bin
- Create a folder called backups (the compiler will make a backup of your shader_names file every time you compile a shader)
- Type cmd into the address-bar of your file-explorer window and hit enter to open a commandprompt that points to this directory
Use the following to compile your shader: shader_tool z_scrolling_hud
- This will compile the Vertex- & Pixelshader using microsoft’s fxc shader compiler
- Shader_tool will also add the hashed shader names to the shader_names file and copy the compiled binary shaders over into » root\raw\shader_bin
8. Adding your custom material to your mod/map
- Now just do what you normally do when adding custom materials to your mod/map
(This is not different in any way. You don’t need to include any files that we’ve created besides the material from Asset Manager.)
1. Zone File
material,z_scrolling_hud2. GSC
precacheShader( "z_scrolling_hud" );   // Precache our material
/* ... */

self thread addHud( );
/* ... */

addHud( )
{
   self.shaderTest = newClientHudElem( self );

   self.shaderTest.x = 0;
   self.shaderTest.y = 0;
   self.shaderTest.alignX = "left";
   self.shaderTest.alignY = "middle";
   self.shaderTest.horzAlign = "center";
   self.shaderTest.vertAlign = "middle";

   self.shaderTest.sort = 1;
   self.shaderTest.alpha = 1.0;
   self.shaderTest.hideWhenInMenu = false;

   self.shaderTest setShader( "z_scrolling_hud", 64, 64 );
}
Build your mod/map fastfile and put your .iwi into your .iwd
Run the game and test :)
Quick links for the individual files within the material chain with more in-depth information
MaterialTemplates :: Techsets :: Techniques :: Statemaps :: PixelShader :: VertexShader